Access from '216.73.216.24'
You are in US.
It is 10:14 JST now.
Ubuntu 22.04 サーバー Ipv6 PPPoE Unnumbered (固定IP) ルーター 作成
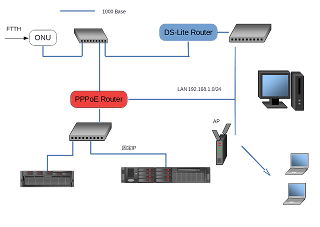
ネットワーク図(赤部分が今回のルーター
ルーター設定手順
IP 設定
ネットワークのIP設定を確認します。
unnumbered(固定 8IP): 200.100.50.0/29 LAN: 192.168.1.0/24
インターフェース enp1s0: emu に接続 enp2s0: 200.100.50.1 enp2s0: 192.168.1.1
/etc/netplan/50-cloud-init.yaml は以下の様になります。
- bondingあり
設定を表示 – ネットワークインターフェースが3個以上必要なのでちょっと、凝って4つのインターフェースを使い、ボンディング設定(クリックして表示)をしてみました。もちろん自分のIPに応じて変更して下さい。ボンディングのモードについては、拙作の英語版サイト https://ntools.org/bonding/ に書いています。 - 通常の設定
設定を表示 – ボンディングなしの通常の設定例はPPPoE以外のネットワーク設定ということを用意に理解できるものになっています。Ubuntu 22.04 では gateway6 gateway4 はWarning が出ます。routes: で指定しましょう。
パッケージインストール
必要なパッケージ、ppp pppoe などをインストール。
# apt install ppp pppoe dhcpcd5
# systemctl enable pppd-dns.service プロバイダDNSを使用する場合
編集するファイルは以下の通りで、クリックしてそれぞれ、表示された指示通りに編集して下さい。
-
- /etc/ppp/chap-secrets
- /etc/ppp/pap-secrets
- /etc/ppp/peers/dsl-provider6
- /etc/ppp/ip-up 関連
- systemctl enable pppd-dns.service を実行
ufw の設定
ufw 設定と言っても中身はiptables の設定で、Masquarade でLANとWANとの接続を行ったり、サービスを開放します。また カーネル動作のシステム変数をセットも行います。
forwarding 設定、ufw 未使用でも動作させたい場合
/etc/sysctl.conf のエディト。11行目のコメントを解除。
# Uncomment this to allow this host to route packets between interfaces
#net/ipv4/ip_forward=1
#net/ipv6/conf/default/forwarding=1
#net/ipv6/conf/all/forwarding=1

       ↓
net/ipv6/conf/default/forwarding=1
net/ipv6/conf/all/forwarding=1
forwarding 設定、ufw 使用時
/etc/ufw/sysctl.conf のエディト。11行目のコメントを解除。
# Uncomment this to allow this host to route packets between interfaces
#net/ipv4/ip_forward=1
#net/ipv6/conf/default/forwarding=1
#net/ipv6/conf/all/forwarding=1

       ↓
net/ipv6/conf/default/forwarding=1
net/ipv6/conf/all/forwarding=1
forwarding 設定、ufw 未使用でも有効
/etc/sysctl.conf のエディト。33行目のコメントを解除し、1行追加。
# Uncomment the next line to enable packet forwarding for IPv4
#net.ipv4.ip_forward=1

# Uncomment the next line to enable packet forwarding for IPv6
#  Enabling this option disables Stateless Address Autoconfiguration
#  based on Router Advertisements for this host
#net.ipv6.conf.all.forwarding=1


       ↓
# Uncomment the next line to enable packet forwarding for IPv4
#net.ipv4.ip_forward=1

# Uncomment the next line to enable packet forwarding for IPv6
#  Enabling this option disables Stateless Address Autoconfiguration
#  based on Router Advertisements for this host
net.ipv6.conf.all.forwarding=1
net.ipv6.conf.default.forwarding=1
/etc/default/ufw のエディト。
# Set the default forward policy to ACCEPT, DROP or REJECT.  Please note that
# if you change this you will most likely want to adjust your rules
DEFAULT_FORWARD_POLICY="Drop"
       ↓
DEFAULT_FORWARD_POLICY="ACCEPT"
/etc/ufw/before6.rules のエディト。はじめにMasquaradeを記述
#
# rules.before
#
# Rules that should be run before the ufw command line added rules. Custom
# rules should be added to one of these chains:
#   ufw-before-input
#   ufw-before-output
#   ufw-before-forward
#

# Masquarade ここから
*nat
:POSTROUTING ACCEPT [0:0]
:PREROUTING ACCEPT [0:0]
-A POSTROUTING -s fd00:cafe/64 -j MASQUERADE  // 任意のIPv6 Local IPアドレス
COMMIT
# don't delete the 'COMMIT' line or these rules won't be processed
# ここまで追加

# Don't delete these required lines, otherwise there will be errors
*filter
:ufw-before-input - [0:0]
:ufw-before-output - [0:0]
:ufw-before-forward - [0:0]
:ufw-not-local - [0:0]
以下のコマンドを実行してLAN側からのアクセスをすべて許可(外部からは不可)
ここで許可するのは、このルーターに対するものだけです。 WAN 側に接続されたサーバーのポートなどの許可をする必要はありません。サーバーアクセス制限はそれぞれのサーバーで行います。
# ufw enable
# ufw allow from fd00:cafe::/64
# ufw allow from 2000:bedd:cafe:aaaa::/64     割り当てられた IPv6アドレス
ufw enable 実行し、有効化するには再起動が必要です。
dhcpd 設定
別途ネームサーバーがあれば不要です。インストールは簡単に出来きて手順は以下の通りです。
$ sudo apt install dhcpcd5
dhcpcd の設定ファイルは /etc/dhcpd.conf で、編集は好みのエディタで編集します。
noipv6rs
denyinterfaces enp1s0 enp2s0 enp4s0
noipv4
noipv4ll

interface ppp0
  ipv6rs
  iaid 1
  ia_pd 1 enp3s0
この時点で poff dsl-provider 実行し、再起動した後に ppp0 が接続された事を確認してください。勿論、enp2s0 に接続されたサーバーなどからインターネット接続されたことも確認できるでしょう。
Unbound インストール
別途ネームサーバーがあれば不要です。インストールは簡単に出来きて手順は以下の通りです。
$ sudo apt install unbound
unbound の設定ファイルは /etc/unbound/unbound.conf.d/unbound-local.conf で、編集は好みのエディターで以下の様なものがサンプルになります。設定は interface: に自分のIPアドレスをIPv4、IPv6 それぞれ設定すればOKです。
また、アクセスを許可する ネットアドレスを access-control: で設定します。下記のサンプルは、allow すなわち許可範囲で deny 禁止も可能です。Unboundに関しては日本Unboundユーザー会に詳しく解説されています。
server:
    interface: 127.0.0.1
    interface: 192.168.1.1
    interface: 200.100.50.1
    access-control: 200.100.50.0/29 allow
    access-control: 192.168.1.0/24 allow
ppp.service の登録
エディターで /etc/systemd/system/ppp.service を以下のように作成します。
[Unit]
BindsTo=sys-subsystem-net-devices-enp1s0.device
After=sys-subsystem-net-devices-enp1s0.device

[Service]
ExecStartPre=/sbin/ip link set mtu 1508 dev enp1s0
ExecStartPre=/sbin/ip link set up dev enp1s0
ExecStart=/usr/sbin/pppd call dsl-provider
Type=forking
SuccessExitStatus=5
RestartSec=3S
PIDFile=/run/ppp0.pid

[Install]
WantedBy=sys-subsystem-net-devices-enp1s0.device
この中のenp1s0はONUに接続するネットワークインターフェースです。インターフェース名は使用するものを記述してください。
編集終了後、以下のコマンドを実行します。
# systemctl daemon-reload
# systemctl enable ppp.service
# systemctl start ppp.service
下記のコマンドを実行して ppp0などが表示されてプロバイダーから指定されたIPになっていることを確認してください。再起動も忘れずに!
# ip address show
